Your Cart is Empty

Complete beginner's guide to transforming your truck into a comfortable camping setup in just 6 hours
You don't need to spend thousands on commercial solutions. This DIY truck bed sleeping platform is perfect for weekend warriors, overlanders, and anyone looking to maximize their truck's versatility without breaking the bank.
Thanks to Saya for sharing this practical build guide.
Commercial truck bed platforms range from $800-$2,500. This DIY version costs under $150, saving you over 80% while delivering the same functionality.
Adjust dimensions to fit your specific truck model and camping gear needs. Add storage compartments, drawers, or modifications exactly how you want them.
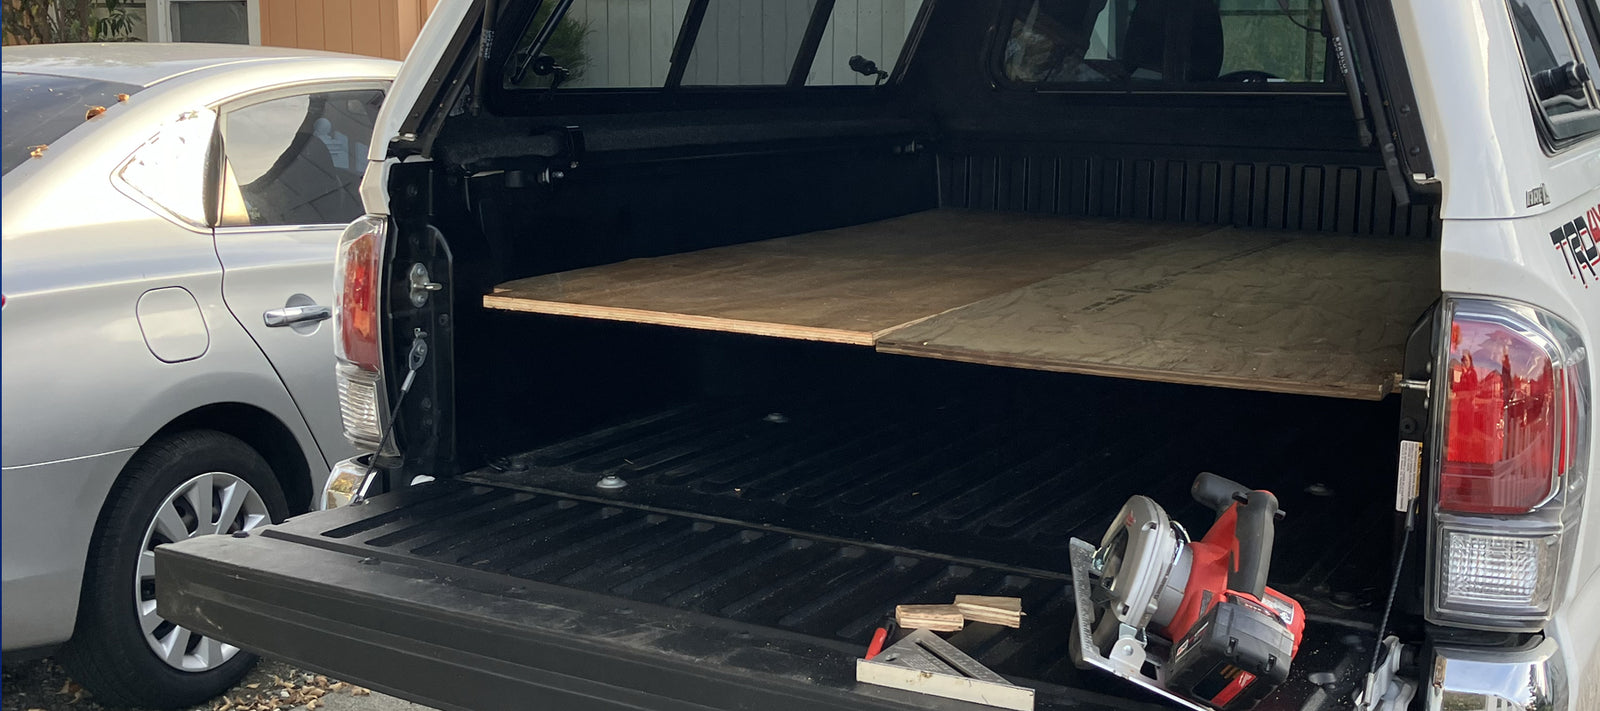
Unlike permanent builds, this platform removes in minutes, giving you full truck bed access whenever you need to haul lumber, furniture, or other cargo.
The raised platform creates 7 inches of storage underneath, plus an optional pull-out drawer for organized gear storage.
Why did you choose to go this route for your Truck?
The low cost and utility; the platform and drawer can be removed in a minute or two and I can have full access to the truck bed. As someone with no building experience and limited tools, it was also approachable. I travel for work and was able to build it in the backyard and kitchen where I was staying, so it’d be an easy project for anyone!
How long did your build take you?
I’d guess six hours total. Three for the platform and three for the drawer. It would have been faster if I had experience, for sure.
What are the benefits of a DIY Platform Build?
Cost of course, and you can alter it to your taste and preferences. Because it’s cheap and only uses a few materials, if I decide to go a different route in the future, I won’t be upset or at a major loss.
What are the challenges of a DIY Platform Build?
Mostly just figuring it out and getting the fit right in the truck as someone with no building experience. It was actually really easy.
What would you change about your Build? (if anything?)
I would make the platform a little lower. But, the Tacoma has slots to insert the cross pieces without having to attach anything to the truck bed, and they are so easy to use! They just sit the platform up kind of high. I don’t need that much storage space under the bed, so I’d rather have the headroom.
What supplies/tools did you use:
Tools used:
Cordless drill and circular saw, speed square and tape measure, wood glue, 1 ½” wood screws, staple gun and one bar clamp.
Materials: I salvaged two sheets of ¾” plywood from a job site, and bought one 2" x 6" x 10’, one roll of indoor/outdoor carpet and a piece of rope that I had.
Rescue some slightly used sheets of plywood from your job, or buy it if you have to.
Buy a 2" x 6" x 10’, you can get it cut at the wood shop so you don’t have to drive with a board sticking out of the cap. You’ll need two 57” planks for the cross supports. Tacomas have slots that these fit perfectly into, so you don’t need to attach the wood to the bed in any way.
Grab some cheap indoor/outdoor carpet while you’re there. And any other tools/materials you need from the list above.

Measure and cut your sheets of plywood so you have two pieces for the platform. I measured mine to 70” x 28” to leave room for the carpet. Reserve the scraps for building your drawer.
Put your 2" x 6" planks in the slots in the truck bed and lay the plywood over it. You’ll need to notch out the corners near the tailgate. I used a “guess and check” method on this. I drew a notch, cut it out and tested it. That’s probably what carpenters do, right?

Roll your carpet out, fuzzy side down. Put your plywood pieces on them and trace and/or cut the shapes out, leaving two inches or so for stapling the carpet down.
Fold the carpet around the boards and staple the carpet on the undersides of the plywood. You may need to snip some cuts into the carpet to get it to fold and lay flat.
Your platform is done! Open a beer to congratulate yourself, if you haven’t already. If you want to build a drawer, keep reading.

Find the plywood scraps left from your platform. I cut the four side/wall pieces from one scrap piece: two 7” x 18” pieces and two 7” x 70” pieces. Then from the other scrap, cut a 70” x 18” bottom piece.
Glue and clamp together one of the 7” x 18” pieces between the two 7” x 70” pieces, these will be three side of your drawers, you could put the other short piece on the other end if you have two clamps, but remember this is a budget build so I only bought one clamp!
Drill and screw your pieces together, let the wood glue dry.

Then wood glue and drill your bottom piece to the sides of your drawer.


Everything you need to know about building your DIY truck bed sleeping platform
This design works best with Toyota Tacoma beds that have built-in cross support slots. For other trucks, you'll need to add L-brackets or mounting hardware to secure the 2x6 cross supports.
Compatible trucks include Ford Ranger, Chevrolet Colorado, GMC Canyon, Nissan Frontier, and full-size trucks like F-150, Silverado, and RAM (with dimension adjustments).
With ¾" plywood and proper support, this platform easily handles 400-500 lbs (two adults plus gear). The limiting factor is usually the cross supports, not the plywood.
While possible, it's not comfortable. The carpet provides minimal cushioning. We strongly recommend a quality camping mattress like the HEST Dually for a good night's sleep.
The weight and cross support design keep it stable during normal driving. For extra security, especially off-road, add bungee cords or ratchet straps to secure the platform to your truck bed tie-down points.
Check your local laws. In most areas, cargo must be secured but this design is legal as it's secured by the cross supports and weight. Never have passengers in the truck bed while driving.
Absolutely! Adjust the 70" length to your bed dimensions minus 2-3" for clearance. All other steps remain the same. Just measure your truck bed carefully before cutting.
It's recommended but not required. Polyurethane or marine sealant will extend the platform's life, especially in humid climates. Apply to all exposed wood edges for best protection.
Yes! Many builders cut the platform into 2/3 and 1/3 sections and add a piano hinge. This allows you to lift the smaller section for gear access without removing the entire platform.
You can:
The platform provides insulation from the cold truck bed. Pair with a quality mattress and appropriate sleeping bag for temperature control. In summer, the elevated design allows air circulation underneath which helps keep you cooler.
You can, but removing it when not in use extends its life. Moisture, UV damage, and general wear happen faster when permanently installed. Use a tonneau cover if leaving it in place.
Very easy! Just lift out the two platform pieces and remove the 2x6 cross supports. Takes 1-2 minutes total. This is one of the main advantages over permanent builds.
The drawer slides out completely. Store it in your garage or against a wall when you need your full truck bed for hauling larger items.
Yes, but ¾" is recommended for strength. You could use ⅝" to save weight and gain headroom, but it may flex more. Don't go thinner than ½" or the platform won't be sturdy enough.
Check construction sites (ask permission first), lumber yards for scrap, Craigslist/Facebook Marketplace, or home renovation projects in your neighborhood. Saya salvaged hers for free from a job site.
If you camp in wet/humid conditions frequently, yes. Marine-grade plywood is more moisture-resistant and will last longer. For occasional weekend trips, standard exterior-grade plywood with sealant works fine.